

TLDR: This is a tutorial on building the API+UI of NLP text classification web application and deploying it to production.
Github Notebook Demo
Note: The classification model used is by no mean accurate and it’s definitely overfitted over the training dataset. The focus of this post is implementing the fullstack web application. Ref 1. Ref 2.
Table of Contents
While pursuing my Master’s degree at IE, I worked on this Text Classification model as part of the NLP course. The notebook is extra messy but I will try to briefly explain what’s going on in the first section.
NLP Classifier
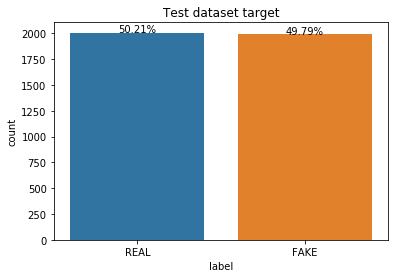 Our problem here is to define whether or not a certain news article is fake news. The dataset is comprised of 3997 news articles each includes a title, text, and the target label as a REAL/FAKE binary label. Part of the course was also testing the model on a test dataset but I never received target for this dataset. The accuracy score of cross validation testing within the training dataset was 94%.
I won’t go through the coding details of the Notebook, but I will briefly describe the main steps taken before coming up with the final model.
Text Preprocessing
We can clearly see that the target is balanced. So we jump ahead into the preprocessing by doing the following:
- Lowercase the text: This preprocessing step is done so words can later be cross checked with the stopwords and pos_tag dictionaries.
- Remove words with just one letter
- Remove words that contain numbers
- Tokenize the text and remove punctuation
- Remove stopwords: Proper analysis of text usually relies on the most recurring words. Stopwords including words as “the”, “as” and “and” appear a lot in a text, but eech word doesn’t really give relevant explanation, so one of NLP comon practices is to remove such words.
- Remove empty tokens: After tokenization, we have to make sure all tokens taken into account contribute to the label prediction.
- Lemmatize the text: In order to normalize the text, we apply lemmatization. In this way, words with the same root are processed equally e.g. when the words “took” or “taken” are found in the text, they are lemmatized to “take”, infinitive of the verb.
You can find the preprocess() function in python_helper.py:79.
Baselining
In this part of the notebook, you can see how I split and vectorize the dataset and run several classifiers on the dataset and measure baseline accuracy.
There was a significant improvement in accuracy for Max Entropy text classifier.
Feature Engineering & Pipeline
After we have a baseline score, we do some extra work:
-
Pos-tag text:
Adding a prefix to each word with its type (Noun, Verb, Adjective,…). e.g: I went to school => PRP-I VBD-went TO-to NN-school
Also, after lemmatization it will be ‘VB-go NN-school’, which indicates the semantics and distinguishes the purpose of the sentence.
This will help the classifier differentiate between different types of sentences.

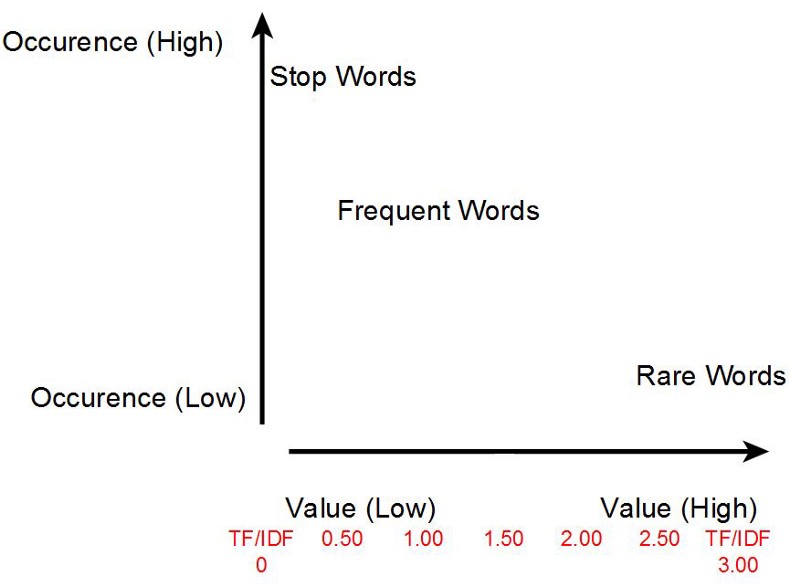
TF-IDF -
TF-IDF weighting:
TF-IDF or Term Frequency–Inverse Document Frequency tries to calculate the importance of each word based on its recurrence in text.
-
Use Trigram Vectorizer instead of regular vectorizer:
I opt to use a Trigram vectorizer here, which vectorizes triplets of words rather than each word separately. In this short example sentence, the trigrams are “In this short”, “this short example” and “short example sentence”.
Finally I do a Grid Search for different combinations of the past steps along with different models to optimize for the best hyper parameters.
If you look just above the predictions here, you will find that this is the best performing model (Vectorizer + TF-IDF + Classifier):
trigram_vectorizer = CountVectorizer(analyzer = "word", ngram_range=(1,3))
tf_idf = TfidfTransformer(norm="l2")
classifier = LogisticRegression(C=1000, class_weight=None, dual=False, fit_intercept=True,
          intercept_scaling=1, max_iter=100, multi_class='warn',
          n_jobs=None, penalty='l2', random_state=None, solver='warn',
          tol=0.0001, verbose=0, warm_start=False)
I wrap everything inside a Pipeline that can train (fit()) and classify (predict()) input easily.
from sklearn.pipeline import Pipeline
pipeline = Pipeline([
     ('trigram_vectorizer', trigram_vectorizer),
     ('tfidf', tf_idf),
     ('clf', classifier),
 ])
Pickling
Next step is fitting the pipeline on train data like so:
pipeline.fit(train.clean_and_pos_tagged_text, encoder.fit_transform(train.label.values))
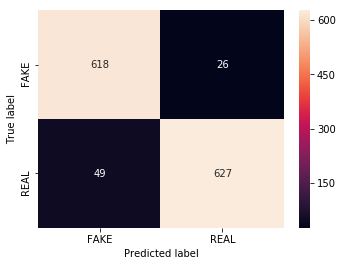
At this stage, the pipeline object can predict() new input. You can find the test predicting step in the notebook here.
Now comes the magic. If you want to encapsulate your whole model along with the training data in one single file to be used anywhere, you use Pickle library.
import pickle
pickle.dump( pipeline, open( "pipeline.pkl", "wb" ) )
Any object in python can be pickled to be saved on disk. Then it can be transferred to be imported in another python environment. What pickle does is that it serializes the Python object before writing it to file. Pickling is just a way to convert any python object (list, dict, etc.) into a character stream. The whole idea behind it is that this serialized textual stream contains everything needed to reconstruct the object in another python script.
In this case we are pickling our pipeline object so we can use it later in the API to pipeline.predict().
This pipeline.pkl file is now ready to predict any news article and classify it to either REAL or FAKE.
Web Application Architecture

So we need a web interface in which the user can enter some news text and click on a button for the application to preprocess the input and feed it to the trained model and show the classification back on screen.
Keep in mind that for the pickled pipeline to predict correctly we need to feed it with text preprocessed exactly in the same way the train dataset was preprocessed.
-
Frontend/UI:
This is going to be a simple one page with one input and a button. No need to complicate stuff. As I mentioned in this post, React would be a better fit for such straightforward function.
-
Backend/Server:
Since we need to “unpickle” or
pickle.load()our model (thepipeline) to use it, the best choice would be a python web server that can receive the input over HTTP and return back the prediction result. One of the easiest and most straightforward frameworks for this is Flask.Another addition to the server would be implementing a “random picker” that can fetch one random news article at a time from the test dataset. This will be used to populate the UI input field.
The goal is to make it easier for the user to test the application, without actually writing a news article.
Flask API Server
Assuming you have a ready Python environment and are familiar with Python development in general, installing pythons is as easy as:
pip install flask
If you want to use a virtualenv you can check the steps here.
A simple Flask API that serves the static React app (next section) when you hit root path / would look like this:
from flask import Flask, render_template

app = Flask(__name__, static_folder="./public/static", template_folder="./public")

@app.route("/")
def home():
    return render_template('index.html')

# Only for local running
if __name__ == '__main__':
    app.run()
You can only make use of template_folder now in which you can add a simple hello world HTML file. In the next section when we build the React app we will use the static_folder store assets like CSS and JavaScript files.
If you run the command python app.py and hit http://localhost:5000 you should see the /public/index.html displayed in your browser.
As discussed in previous section, we mainly have 2 functions to implement here: predict and random. Let’s start with the easier random picker endpoint.
random/:
Since we have the test dataset in the /data folder, we just need to load it and pick a random index and send it back to UI.
from flask import jsonify
import pandas as pd
from random import randrange

@app.route('/random', methods=['GET'])
def random():
    data = pd.read_csv("data/fake_or_real_news_test.csv")
    index = randrange(0, len(data)-1, 1)
    return jsonify({'title': data.loc[index].title, 'text': data.loc[index].text})
We use Pandas here to read the CSV file and then send back the data in JSON format using flask jsonify() helper function.
Now whenever you send a GET request to http://localhost:5000/random/ using Postman or even open the link in your browser you should see a random news entry from the test dataset file.
predict/:
For the prediction function we need to do some work than just exposing the endpoint. We need to take the input, preprocess it, pos-tag it, then feed it to the pipeline and return back the result.
So we create a PredictionModel class in a separate file:
from nltk.corpus import wordnet
import string
import nltk
nltk.data.path.append('./nltk_data') # local NLTK data
from nltk.corpus import stopwords
from nltk import pos_tag
from nltk.stem import WordNetLemmatizer

class PredictionModel:
    output = {}

    # constructor
    def __init__(self, text):
        self.output['original'] = text

    def predict(self):

        self.preprocess()
        self.pos_tag_words()

        # Merge text
        clean_and_pos_tagged_text = self.output['preprocessed'] + \
            ' ' + self.output['pos_tagged']

        self.output['prediction'] = 'FAKE' if pipeline.predict(
            [clean_and_pos_tagged_text])[0] == 0 else 'REAL'

        return self.output

    # Helper methods
    def preprocess(self):
        # check file on github

    def pos_tag_words(self):
        # check file on github
And then we use the class in app.py endpoint like so:
@app.route('/predict', methods=['POST'])
def predict():
    model = PredictionModel(request.json)
    return jsonify(model.predict())
So basically when you send a POST request to http://localhost:5000/predict, the script will initialize a new PredictionModel instance with the input text and return the prediction.
For example PredictionModel("Some news article text"), will return a JSON object like this:
{
  "original":"Some news article text",
  "preprocessed":"news article text",
  "pos_tagged":"NN-news NN-article IN-text",
  "prediction":"FAKE"
}
Note: I exported the NLTK data and you can see I’m loading it from a local path here. The reason for this is both for better version management as I had issues with installing the right NLTK corpse on Docker.
But we used the pipeline object without actually declaring it…
Loading the pickle:
The key idea we need to understand here is that we need to load the .pickle file before using it predict. Note that the pickle file is ~350 MB.
In the top of the file we can add:
with open("pickle/pipeline.pkl", 'rb') as f:
        pipeline = pickle.load(f)
Keep in mind this loads when you first run the app.py script and it loads the 350MB pipeline object into your machine RAM.
After initial run and when the script is in standby mde waiting for requests, Whenever you call pipeline.predict() in your script it will run instantly because the object is already in your RAM.
Note: This will work fine when you run it locally, but when you deploy it into production you need to consider your server RAM and what happens if the script crashes. I will discuss this in the Deployment section.
React User Interface
To initialize the React app we will use create-react-app. You can install that globally by running npm i -g create-react-app.
Then to initialize the actual code template we run create-react-app fake-news-client. This will create a folder with the name “fake-news-client” and npm install the needed packages inside it.
If you cd into the folder and run a simple react-scripts start you should have a simple react app built and served in your browser on http://localhost:3000/.
Note that the backend files will be the root folder of the project and the frontend will live in a subdirectory inside it with the name
webapp.
Now we need to install an extra package we will use in the project. cd into the folder and run npm i -s node-sass.
I’m using node-sass to write the app styles which means you need to rename all the .css files into .scss and change the reference in the index.js file.
Let’s build the UI
In the /src/index.js file we can start adding the state object along with the HTML template that consists of:
- Input: textarea for the news text
- Actions: button to get
/randomdata and another to/predict - State Labels: App can be in one of theses states: idle, loading, or error.
- Result label: Prediction, REAL/FAKE.
import React from 'react';
import ReactDOM from 'react-dom';
import './index.scss';

class NLPInterface extends React.Component {

  state = {
    text: '',         // Textarea value
    loading: false,   // Loading state flag
    error: false,     // Error state flag
    prediction: null, // Prediction result
  }

  render() {
    return (
      <div className="container">
        <h1>NLP Fake News Classifier</h1>

        <textarea disabled={this.state.loading} value={this.state.text} onChange={this.updateInput}>
        </textarea>

        <button disabled={this.state.loading} className="random" onClick={this.random}>
          Load random News from test dataset ? <span>Click here</span>.
        </button>

        <button disabled={this.state.loading} className="cta" onClick={this.predict}> Predict </button>

        {this.state.loading ? <h1>Classifying ...</h1> : ''}

        {this.state.error ? <h1>ERROR</h1> : ''}

        <h1>
          {this.state.prediction}
        </h1>

      </div>
    )
  }
}

ReactDOM.render(
  <NLPInterface />,
  document.getElementById('root'));
You can find the styles in the SCSS file.
Next step would be writing down the UI logic needed to to wire the template with the backend.
Let’s start by the textarea, we can see it reads it’s value from this.state.text, and onChange we are binding the this.updateInput event handler which will update state.text
  updateInput = ({ target: { value } }) => this.setState({
      text: value,
      prediction: null // To reset previous prediction whenever the text in the textarea changes
    });
Next we have the Random news picker button, which fires the following function onClick:
  random = () => fetch("/random")
    .then(response => response.json())
    .then(article => article.title + '\n\n' + article.text)
    .then(text => this.setState({
      text,
      prediction: null
    }))
    .catch(error => this.setState({ error: true }));
Finally, we have the actual prediction function binded to another button:
  predict = () => {
    this.setState({ loading: true, prediction: null }); // Start loading

    fetch("/predict", {
      method: 'POST',
      headers: { 'Content-Type': 'application/json' },
      body: JSON.stringify(this.state.text)
    })
      .then(response => response.json())
      .then(({ prediction }) => {
        this.setState({ loading: false, prediction })
      })
      .catch(error => this.setState({ loading: false, error: true }))
  }
This will get the prediction result, store it to state.prediction which is displayed in the H1 tag at the bottom of the render() function.
Voila! we have a working webpage that can communicate with our Flask backend.
Bundling
To bundle the frontend app and move it to the /public folder which the Flask app will serve, we will edit the package.json file:
  "scripts": {
    "prebuild": "rm -r ../public",
    "build": "react-scripts build",
    "postbuild": "mv build/ ../public",
  }
Now if you run npm run build inside webapp folder then go up one directory
and run python app.py then visit http://localhost:5000 you will find the app up and running 🎉🎉
Dockerizing & Deployment
To run this app successfully on a remote server we need to consider that this will be a service with a relatively slow boot time, as we load the 350 MB pickle once the script runs.
For this we will use gunicorn HTTP server to run the python app. gunicorn will basically:
- Run the server script several times in parallel using multiple async workers
- Make sure the server is always running and accepting requests
After running pip install gunicorn you can run the following to run the script using gunicorn:
gunicorn -t 120 -b :8080 app:app
This will run the server on port 8080 and I added the -t 120 flag to tell it to wait 120 seconds before timing out.
Now we move to deployment. I chose to use Google Cloud Run for this application also because our application has a heavy stateless workload as it needs to load the large pickle file.
To use Cloud Run we need to containerize our application by writing down the Dockerfile:
FROM python:3.7-stretch

RUN apt-get update -y
RUN apt-get install -y python-pip python-dev build-essential

COPY . /app
WORKDIR /app

RUN python -m pip install --upgrade pip

RUN pip install -r requirements.txt

CMD gunicorn -t 120 -b :$PORT app:app
You can see also that I exported all of the needed python packages into a requirments.txt file.
Finally, to get this to work on Google Cloud you need to:
- Start a Google Cloud Project
- Activate billing
- Open Google online console
- Pull the code into your account server
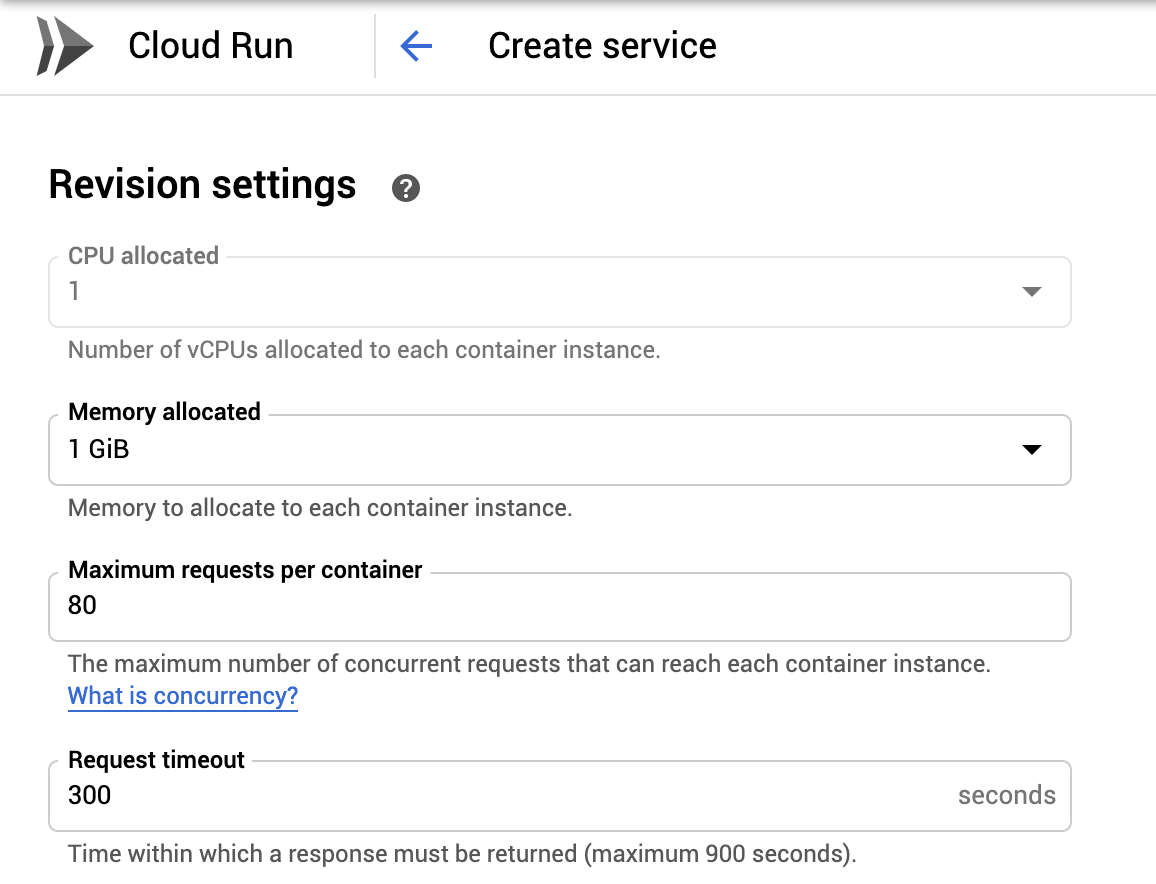
cdinto the project folder and rungcloud builds submit --tag gcr.io/[your project ID]/fake-news-serviceThis will deploy the docker container image into that URL.- Go to the Cloud Run dashboard and click on “Create Service”
- Type the image URL you created in step 5
- Set the memory allocated to 1GB
- “Create”
💃🏼 💃🏼 The app will be up and running in less than 5 minutes. 💃🏼 💃🏼
Related Links: